

Intimidated by the thought of making homemade bread? This Easy No Knead Bread recipe will change that – guaranteed!
This is the first homemade artisan bread that I learned how to make, and it is still one I make often because it is just so good.
There is nothing like having fresh bread at your fingertips. This is such a great recipe to have in your kitchen repertoire!
This easy artisan bread comes out with the perfect chewy texture and crispy crust every time. It is made with just 4 ingredients and you don’t need any special skills or equipment to make this bread happen.
For more delicious and easy bread recipes, check out this Vegan Rye Bread, Vegan Italian Bread, and Cinnamon Raisin Bread.
Why You’ll Love This Recipe
- No kneading – Only the smallest amount of mixing is required for this recipe – no kneading at all!
- No special equipment necessary – You absolutely CAN use a Dutch oven to make this recipe, but it is not strictly necessary. If you don’t have a Dutch oven, you’ll use a deep stock pot that is oven-safe as well as a baking sheet to sit on top of it.
- Perfect texture – This bread comes out light and fluffy with a perfectly crispy crust and enviable crumb – every time.
- Amazing flavor – The longer dough rise time brings out the most amazing flavors in this bread.

Ingredients
Dry Ingredients
- All-Purpose Flour – I use all-purpose flour for this recipe. There is no need for specialty flours, but you can use whole wheat flour if you prefer. I have not tried this recipe with gluten-free flour yet. Just note that you may need to adjust the amount of water used based on what type of flour you use as different flours absorb liquid differently.
- Instant yeast – Instant yeast or active dry yeast both work for this recipe.
- Salt – The salt brings out some amazing flavor in this bread as well as improves overall texture, so don’t omit it. Regular table salt is fine, or you can use pink salt, kosher salt, or sea salt.
Wet Ingredients
- Warm water – The water needs to be very warm to activate the yeast. The water should feel almost hot to the touch, but not so hot that you can’t hold your hand under it. If the water is too hot, it will kill the yeast.
- Optional: Add a little bit of olive oil to the dough for some added flavor.
Helpful Equipment
- Bread whisk or wooden spoon
- Large bowl
- Large oven-safe stock pot or Dutch oven – This bread is baked at 450 degrees Fahrenheit, so make sure your chosen vessel is safe at that high temperature.
- Large baking sheet
- Parchment paper
- Sharp knife – Use a good quality serrated bread knife for best results.
How to Make Easy No-Knead Bread
This is a detailed step-by-step guide on how to make this recipe including photographs. For the quick version, skip ahead to the recipe card below!
To save you from having to do the math, I’m going to be giving these instructions based on the time when you want the bread to be ready to eat.
Mix the Dough (22 hours before eating)
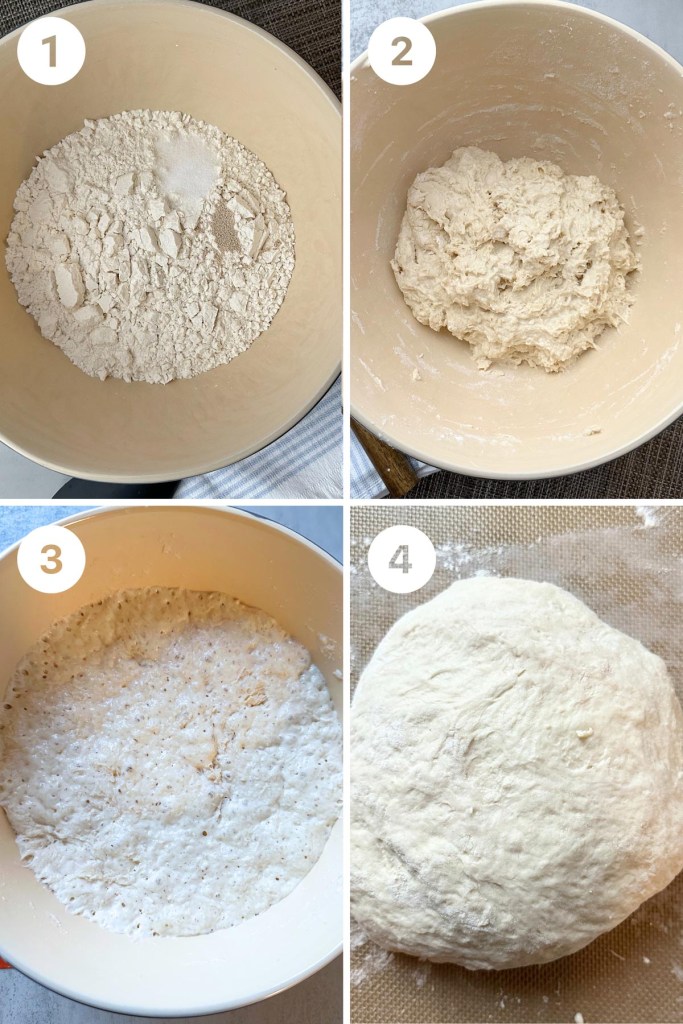
Begin by adding the flour, yeast, and salt in a large mixing bowl. Make sure the bowl is large enough for the dough to at least double in size.
Next, add in the warm water and use your hands to combine the ingredients just enough that there are no clumps of flour left. This should take less than one minute.
This will be a very shaggy and sticky dough to begin with. Don’t worry, it will begin to resemble normal bread dough as we go along.
First Rise (Overnight Rise)
Cover the bowl in plastic wrap and let the dough rest in a warm-ish area of your home that is free from drafts. I normally place the bowl on my kitchen counter in a corner where it can sit under the under-cabinet lights for some extra heat. You can also place the dough in your oven with the oven TURNED OFF and just the oven light on.
Let the dough rise for at least 12 hours and up to 18 hours. The longer rise time brings out some delicious flavors. If you’re short on time, just let rise a minimum of 12 hours.
Shape the Dough, Second Rise (4 hours before eating)
Once the dough has risen, remove it from the bowl by dumping it onto a well-floured working surface like a silicone baking mat. Fold a few times to shape the dough into a ball.
Next, place the dough onto a piece of well-floured piece of parchment paper and transfer it to a large, clean bowl. Cover the bowl with a kitchen towel and let rest for another 2 hours.
Prep the Oven (2 hours before eating)
About 30 minutes before you are ready to bake the bread, preheat your oven to 450 degrees Fahrenheit with your dutch oven or stock pot and baking tray inside. Make sure all parts of your chosen vessels are oven are safe for this temp!!! Some dutch oven handles are not approved for this high of a temp.
Once the oven has reached 450 degrees, let the equipment sit inside for at least 15 minutes before moving on to the next step.
Bake the Dough (1 hour, 15 minutes before eating)
After the dough has rested, remove the kitchen towel and use a bread lame, sharp knife, or kitchen scissors to make a few slits in the top of the dough to let steam escape while it bakes. If you skip this step, the loaf will bulge in odd areas while the bread bakes.
Next, carefully pick up the ends of the piece of parchment paper and place the dough and parchment paper directly into the preheated Dutch oven or stock pot. If your lid (and its handle!) is oven-safe, place the lid on the Dutch oven. If you are using a stock pot or your Dutch oven lid is not oven-safe, place an upside-down baking tray on top of the stock pot. Don’t forget to use oven mitts for this step!
Bake the bread at 450 degrees Fahrenheit covered for 30 minutes. After 30 minutes, remove the cookie sheet or Dutch oven lid. The crust should just begin to turn golden brown.
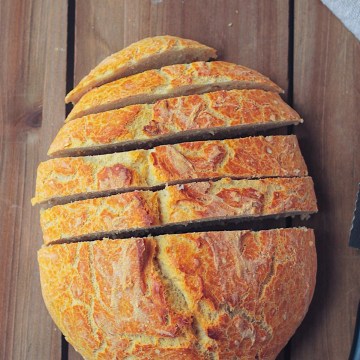
Bake another 15 – 20 minutes – this is where the deep golden-brown crust magic happens! If you are unsure if the bread is done, use a meat thermometer to make sure the internal temperature is at least 207 degrees Fahrenheit.
Remove from Oven (30 minutes before eating)
Remove the bread from the oven and let it cool for at least 30 minutes before slicing and serving.
The bread should be springy when compressed – that is how you know it is ready to slice.
That’s it! This crusty bread is ready to enjoy. Enjoy fresh or place a slice in the toaster and load it up with vegan butter – my favorite way to eat this bread!
How to Store Easy No-Knead Bread
- Room Temp: After the loaf has cooled completely, store it in an airtight container or plastic bread bag for up to 3 days at room temperature.
- Freezer: Freeze this bread in slices after it has cooled fully. Up to 3 months for best flavor.
More Tips for Making Easy No-Knead Bread
- Gluten-free? Try a certified gluten-free flour instead! I have not tried this recipe with gluten-free flour yet, but I suspect a gluten-free bread flour would work. Again, you may need to adjust the amount of water used or how much flour you use to get the right consistency.
- Want to Mix it up? Add some seeds of your choice throughout the dough or sprinkled on top before baking.
FAQ
Yes, you should use instant yeast or active dry yeast for this recipe. Other types of yeast require activation before use.
You can add a bit of vegan sugar or sweetener to this bread if you prefer (up to 2 tbsp). It will feed the yeast faster and your rise times may vary, make sure to watch closely.
Easy No Knead Bread
Equipment
- Dutch oven (or large stock pot and baking sheet)
- Medium cookie sheet (if your Dutch oven lid is not oven safe at 400 F)
- Bread lame (optional)
- Bread whisk
- Parchment paper
Ingredients
- 3 cups all-purpose flour
- ¼ tsp instant yeast
- 1 tsp salt
- 1 ⅝ cup warm water (5/8 cup is equal to 1/2 cup + 2 tbsp)
- 1 tbsp seeds (optional)
Instructions
Make the Dough
- Mix the flour, yeast, and salt into a large mixing bowl.
- Add the warm water and mix to combine. This should take less than a minute.
First Rise
- Cover the bowl and keep in a warm-ish area for 12-18 hours.
Work the Dough, Second Rise
- After the first rise, uncover the dough and place onto a well-floured working surface. Fold the dough a few times onto itself until a uniform ball has formed. Transfer this dough to a well-floured piece of parchment paper and place in a clean bowl. Cover lightly and let rest 2 more hours.
- Preheat the oven to 450 with the Dutch oven inside. Once the oven has reached heat, let sit 15 minutes before placing the dough inside the Dutch oven. Cover with lid.
Bake the Bread
- Bake the loaf covered for 30 minutes, then remove the lid. Bake 15 more minutes uncovered.
- Remove from oven and let rest at least 30 minutes before slicing.
- Serve and enjoy!
Notes
- Gluten-free? Try a certified gluten-free flour instead!
- Want to Mix it up? Add some seeds of your choice throughout the dough or sprinkle on top before baking.
Nutrition
Please note, while all ingredients used in this recipe have been verified to be vegan and free of applicable allergens at the time of recipe creation, different brands may differ in their ingredients or processing procedures and may change their ingredients at any time. For some recipes, I do include ingredients that are processed in a facility that processes other allergens. Please make sure to check the ingredients and processing procedures for your specific purchases to ensure they meet your dietary needs.
Last Updated on March 21, 2025


This bread is seriously so easy and so delicious. I love not having to knead it!